Several of my rings are appearing in Ring O Blog!
Elektrosawruslove blogged about me.
A pair of my earrings were featured at Cuteable.
Sunday, September 28, 2008


Thursday, September 25, 2008
I Want This!
So, I'm going to let the cat out of the bag .... I, the plastic jewelry designer/creater/connoseuier, do not actually wear very much plastic jewelry. In fact, I don't really wear very much jewelry of any kind. I used to be really into chandelier earrings when I was 16 and I just never bothered to update my style, so, yeah.
That said, I do have a kind of necklace that I prefer and want to own and, of course, wear. And *GASP* the style looks nothing like that ones that I create! Anyway to give you an example, here is one such gorgeous necklace that I am lusting after from a fellow Kentuckian's shop:

NOBODY BUY IT, IT'S MINE IN THE FUTURE.
Wednesday, September 17, 2008
Renegade Craft Fair
Did I mention that I took a road trip up to Chicago to see Renegade this past weekend? Here is what it looked like:

All the vendors were amazing, and there was still a surprising amount of traffic despite all the rain!
Speaking of traffic, we were stuck in it for 11 hours on the way back. It's a 4 hour drive, but all the highways were closed due to flooding. Ah, lengthy car rides with college mates I barely know. Gotta love it!
PS I applied for the Holiday fair, wish me luck!
Monday, September 8, 2008
Update from my life

Hello! Wow have I been busy lately! What with all the (ex)boyfriend drama (yeah, we're still broken up, and neither of us are handling it very well) and then the whole leaving for college and making new friends thing, I've hardly had any time for my business! I did manage to create and list a few new things at http://omglia.com including a bunch of rings, and some new Halloween merch like a necklace, a bead/charm lot and a charm bracelet. But more on that later - for now I just want to post pics of my dorm room!! That first pic is my computer area. Yes my TV says RELAX on it, I got that in a swap on Crafster :D
 And this pic on the right is my bed. And by bed I mean workstation and by workstation I mean where I make jewelry. My sewing machine is tucked away in my closet and my beading supplies are all shelved in that little bookcase there, and all of my packaging materials are in boxes under my bed haha. Anyway that's the update from me, I'll be posting more soon with all my new Halloween products! Until then, please admire this beautiful picture of me. *fans self* Hehe.

Saturday, August 23, 2008
Consignment
I've got some items being sold online at Oak Boston as well as in their store! Check out the Mario mushroom necklaces :) Exciting!
Wednesday, August 13, 2008
And the winners are ....
I chose the winners for my giveaway the old-fashioned way; I wrote them all down, cut them out, and drew 3 names out of the pile randomly! The winners are sweetcharade, spottedonetsy, and whimsicalcreations. I've emailed them already :) Congrats!
In other words, I've been going through some really rough patches in the personal/romantic areas of my life and haven't been quite as productive as I could've been. But I did manage to make a killing at a local flea market (because I have a bunch of Louisvillians reading this I will let you in on my secret - there's a flea market in Jtown right on Taylorsville road! Check it out!) Here is the stash I scored after 2 hours of frantic searching through MOUNDS of stuff!
Sunday, August 3, 2008
GIVEAWAY!!! Free prizes!
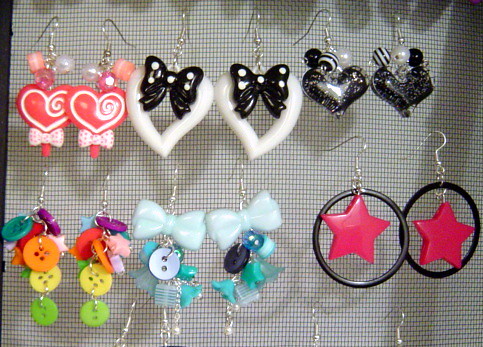
As some of you may know, I recently changed my primary etsy shop from liasaun1.etsy.com to http://omglia.etsy.com. As such, many of my listings have expired - and to be honest I don't feel like relisting them. They're old, the pictures aren't very good, and I'm sick of looking at them in my inventory. So here is your chance to get some of my unsold designs FREE! I will be giving away 3 pairs of earrings. You may enter using the following options. (enter as many times as you can!)
Option 1: Feature my giveaway in your blog. Include a picture of your favorite item from my shop for an extra entry!
Option 2: Have a website, myspace, livejournal? Add my banner and show me where you've added it! You can find a page of easy copy and paste banners for you to add easily RIGHT HERE.
Option 3: Complete this short survey:
1. Have you seen my shop/blog before? If not, where did you find out about this giveaway?
2. What appeals to you about my shop/items for sale?
3. What would you like to see more of in my shop?
4. What do think is the target market for my items (age, income, etc)?
5. Any suggestions or critiques for me?
Giveaway Ends August 10 at 11:59 pm!
Friday, July 25, 2008
Craft Fair Sign Tutorial
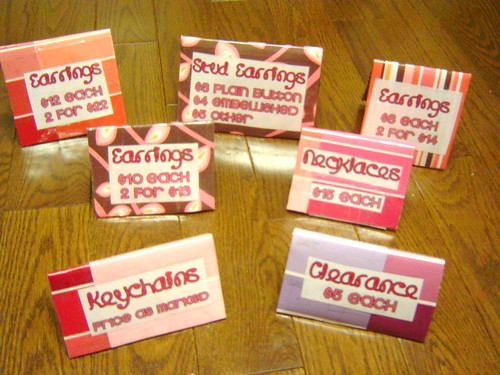
This is the tutorial for my sign displays!
You Will Need
1. Good cardboard. Any ordinary cardboard box will be fine. It doesn't matter if it has writing on it. You'll also need a bit of lighter cardboard, like a cereal box. Yay, recycling!
2. Pretty paper. I used a combination of scrapbooking paper from a craft store and free paint samples from Home Depot! Construction paper, wrapping paper, etc will also work well. Whatever looks good. If you want your signs to match, though, make sure you have enough! I didn't, as you can see, so they're all kind of in the same general color scheme.
3. Access to a printer and computer for designing the actual text. If you're fabulous at handwriting or something, I guess that'll work too, but I found that printed text makes it look more proffesional.
4. Scissors! And possibly a box cutter if you're into that.
5. CLEAR PACKING TAPE. This is important. It's to waterproof everything so it lasts longer!
Let's Begin!
1. Design your labels, print and cut them out. My labels included the name of the item, its price, and sometimes discount for multiple purchases.

2. Cut out strips of cardboard. You will be folding these in half, so make them twice the length of your sign size. To find the width, I held up the cut-out label on top of the cardboard and cut around it. You can of course also make them all one size.
3. Fold your cardboard strips in half. Now they should look like little tents! Cute! If you're using cardboard with writing on it, consider folding them with the writing on the OUTSIDE and the blank side on the INSIDE, because that way you won't see any of the writing stuff once it's covered up *shrug* I'm OCD, are you? Hehe.
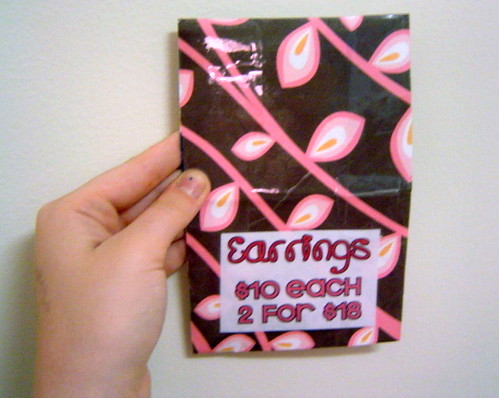 4. Time to get out your tape! Cover your cardboard strip with the decorative paper, tape it in place and then tape all over it (in straight lines, so it looks neat). Also tape your label in place on one (or both, if you like) sides. See the picture to the left for what it should look like now!
5. To prevent sign your flattening on your table, we're going to make a little bridge at the bottom of each tent to hold it in place. I used paint sample paper; any light cardboard (get out those cereal boxes now!) will work fine.
 Fold your tent again and set it at the angle you would like it to stay at forever. Cut out a strip of light cardboard the width of the bottom of your tent. Then tape it to the bottom on top AND bottom of the strip. This is kinda hard to explain, but I'll try. Place a strip of tape underneath the cereal box strip so it goes around on top of the decorative paper sides of the sign, and also one on TOP of the cereal box strip so it stays in place with the tape going up the sides on the INSIDE of the tent. Does that make sense?
 Now your sign is done! Just repeat these steps to make the rest of your signs. They should be sturdy and waterproof, as well as proffesional looking and perfect for your craft fairs! Here is an action shot of my signs:

Wednesday, July 16, 2008
Long time no post
Hello all! Gosh, I've really been slacking off about posting here. Amazingly I've been managing to keep pretty busy despite having personal issues (remember about a month ago, I posted that my boyfriend of 3 years broke up with me? I'm moving on! I even have new mancandy to help with that *wink*) And I've come up with some awesome new stuff I want to share with you!
 First is those wallets I've been talking about forever. They're finally listed and available for purchase on the site! More new wallet designs are coming soon, I'm planning on really expanding my wallet section and doing a lot more custom work.

Next I want to share some new packaging I made last night! I've been seeing bag toppers all over and always wondered "wow how do they make those?" Then - DUH - it hit me like a ton of bricks. They just print out a design on nice paper and fold it in half! Durrr, that's not hard! So I whipped up a design and made some for myself.
 I can't beleive how proffesional they make my orders look! I can't wait to get some more earring orders now (I had a bunch of supplies to send out that I put them on, but I think the earring packaged are prettier!) You can even see the freebie I put into each order in that pic ;) Well, that's all for now! I'll update again soon!
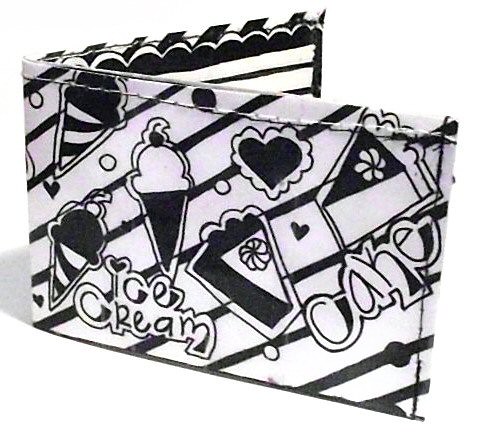 First is those wallets I've been talking about forever. They're finally listed and available for purchase on the site! More new wallet designs are coming soon, I'm planning on really expanding my wallet section and doing a lot more custom work.
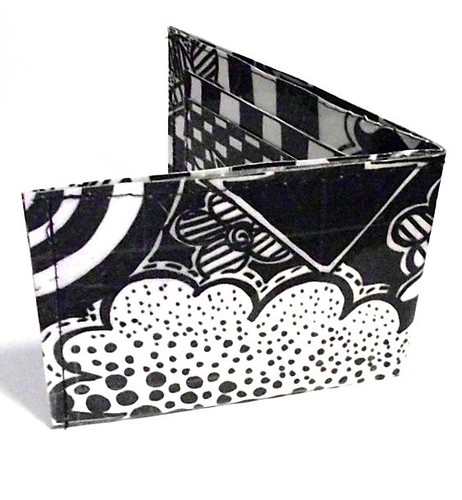
Next I want to share some new packaging I made last night! I've been seeing bag toppers all over and always wondered "wow how do they make those?" Then - DUH - it hit me like a ton of bricks. They just print out a design on nice paper and fold it in half! Durrr, that's not hard! So I whipped up a design and made some for myself.
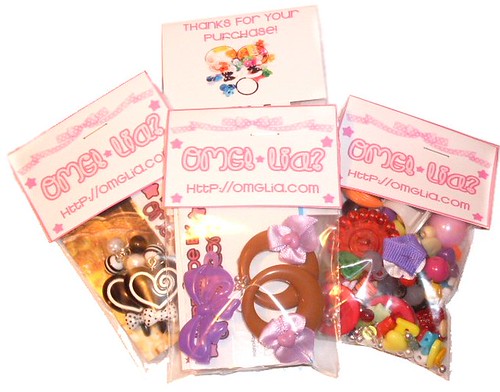 I can't beleive how proffesional they make my orders look! I can't wait to get some more earring orders now (I had a bunch of supplies to send out that I put them on, but I think the earring packaged are prettier!) You can even see the freebie I put into each order in that pic ;) Well, that's all for now! I'll update again soon!
Tuesday, June 24, 2008
Craft Fair Tips
I've been thinking, and I've decided that with 3 craft fairs under my belt (2 not-so-good ones and one very succesful one) I might as well write down some tips for the n00bs. In no particular order, here are mine:
1. Bring everything on this list. I packed up a big box for my first fair and just bring it to each subsequent fair, and nothing ever gets left behind!
2. Make a big excel file of all of your inventory and its price. When you sell something you can cross it off, and then at home you can tally up everything you've sold on the computer to keep track of it really easily. Plus it helps if you forget the price of something or other.
 3. Mark prices very clearly. Some people don't like to ask, and some people decide what to buy based directly from the prices they see. This picture shows my pricing signs: they are little triangles made out of recycled cardboard and pretty paper, laminated (and waterproof) with clear tape. Easy fast and cute, and I can reuse them over and over! I'll make a tutorial if anyone wants one.
4.Have freebies, either from your shop or other people. It creates loyalty because everyone loves freebies! Freebies for your own shop (promotional freebies) should be USEFUL so they don't just get thrown away. My favorite item for this is magnets, which I make myself. Pens, mirrors, etc might also work wonderfully! Make sure your URL is on there and all that. I gave away all but 3 of the 50 or so magnets I had sitting out there, and now they're all sitting on people's fridges for them to see every day!
5. packaging! Bring bags (NOT recycled wal mart bags) with your url or logo somewhere on it. Include a biz card inside. I also toss in etsy promotional packs, makes them feel like they're getting more freebies! Consider wrapping and whatnot if your item works that way.
6. Have a draw like the giant teddy bear I used at my last fair! (see my previous entry for pics) it will attract your target demographic. If you're a soap seller, think about how The Body Shop always has that little dish set out with yummy smelly samples in it OUTSIDE their store, to draw people in, for example. If you sell plushies, make a huge one. If you sell clothes, put your best outfit on a mannequin. Etc! People will see it from far off and want to come check out your stuff!
 7. Displays. Think about how you want your items to be seen. If you are marketing adult-oriented, sophisticated stuff, you may want all matching displays. I personally chose a variety of themed displays for my tables, so it doesn't match very well but does look interesting. For some ideas on DIY jewelry displays, click here. The picture is of an old, dirty necklace stand that I painted! Get creative.
8. You'll hear this one a lot - levels! You need your table to have lots of levels so it doesn't look all boring just laid out in one spot. I personally like to put a box underneath my tablecloths to mix it up and then put things on top of that. The picture is an example. See how one jewelry display is much higher than the other? It makes it look more interesting. Plus, you can fit more stuff on your table that way! Also consider hanging things from the side of your tent. The more levels, the better!
9. Be friendly. My last craft fair, I was going through a breakup. I was SOOOO not in the mood to smile and sell my stuff. But I did anyway (plus my friends showed up to help, which cheered me up!) and I got a lot of return customers from one day to the next! All these teenage girls kept coming back to talk to me, it was adorable! If I would've let my mood take over I would've sat glowering at everyone, but instead I said hi to each customer and sold my products cheerfully. Always stay proffesional.
10. Promote your fair. I know, that's the job of the advertisers ... but in my case, I wasn't sure there was advertising to my demographic. The fair organizers had advertised in the newspaper and around their neighborhood, but I hadn't seen anything on craigslist, facebook, or myspace!! So I got promoting, created a facebook event and a craigslist post. We all know how to advertise here, and the more customers a fair has, the better EVERYONE benefits.
If I think of any more tips I will update! Please add your own too!
1. Bring everything on this list. I packed up a big box for my first fair and just bring it to each subsequent fair, and nothing ever gets left behind!
2. Make a big excel file of all of your inventory and its price. When you sell something you can cross it off, and then at home you can tally up everything you've sold on the computer to keep track of it really easily. Plus it helps if you forget the price of something or other.
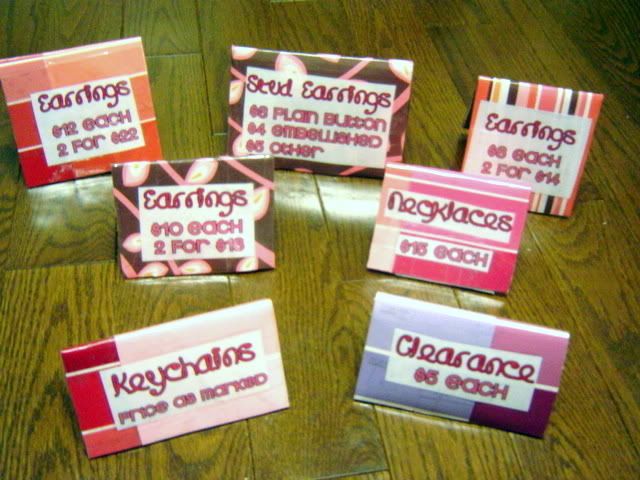 3. Mark prices very clearly. Some people don't like to ask, and some people decide what to buy based directly from the prices they see. This picture shows my pricing signs: they are little triangles made out of recycled cardboard and pretty paper, laminated (and waterproof) with clear tape. Easy fast and cute, and I can reuse them over and over! I'll make a tutorial if anyone wants one.
4.Have freebies, either from your shop or other people. It creates loyalty because everyone loves freebies! Freebies for your own shop (promotional freebies) should be USEFUL so they don't just get thrown away. My favorite item for this is magnets, which I make myself. Pens, mirrors, etc might also work wonderfully! Make sure your URL is on there and all that. I gave away all but 3 of the 50 or so magnets I had sitting out there, and now they're all sitting on people's fridges for them to see every day!
5. packaging! Bring bags (NOT recycled wal mart bags) with your url or logo somewhere on it. Include a biz card inside. I also toss in etsy promotional packs, makes them feel like they're getting more freebies! Consider wrapping and whatnot if your item works that way.
6. Have a draw like the giant teddy bear I used at my last fair! (see my previous entry for pics) it will attract your target demographic. If you're a soap seller, think about how The Body Shop always has that little dish set out with yummy smelly samples in it OUTSIDE their store, to draw people in, for example. If you sell plushies, make a huge one. If you sell clothes, put your best outfit on a mannequin. Etc! People will see it from far off and want to come check out your stuff!
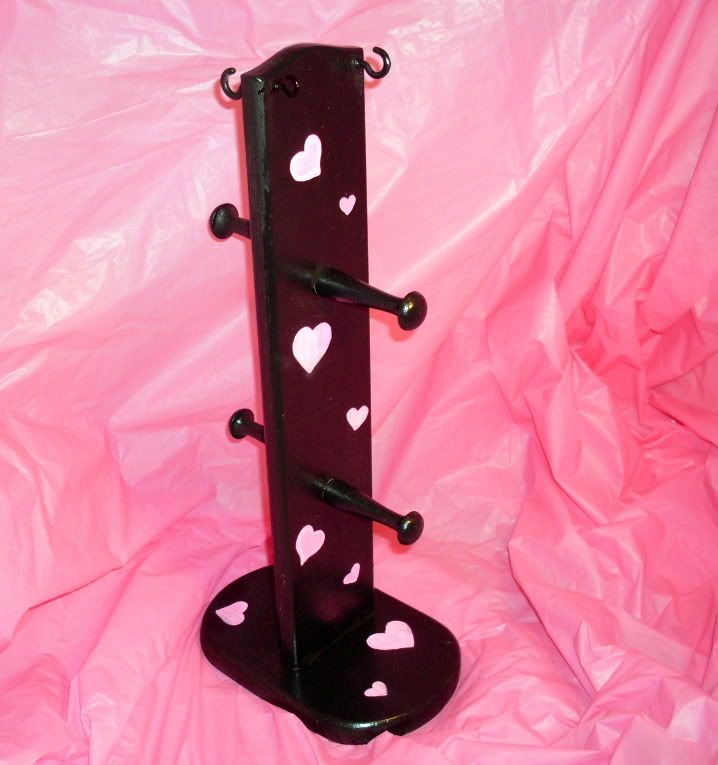 7. Displays. Think about how you want your items to be seen. If you are marketing adult-oriented, sophisticated stuff, you may want all matching displays. I personally chose a variety of themed displays for my tables, so it doesn't match very well but does look interesting. For some ideas on DIY jewelry displays, click here. The picture is of an old, dirty necklace stand that I painted! Get creative.
8. You'll hear this one a lot - levels! You need your table to have lots of levels so it doesn't look all boring just laid out in one spot. I personally like to put a box underneath my
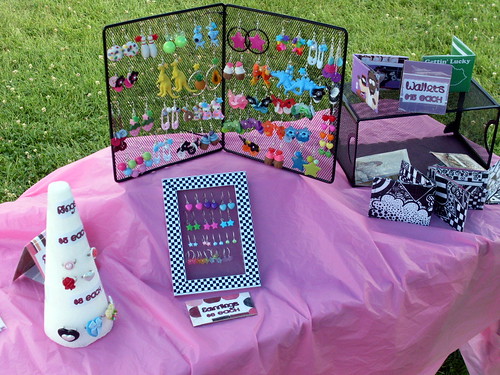 tablecloths to mix it up and then put things on top of that. The picture is an example. See how one jewelry display is much higher than the other? It makes it look more interesting. Plus, you can fit more stuff on your table that way! Also consider hanging things from the side of your tent. The more levels, the better!
9. Be friendly. My last craft fair, I was going through a breakup. I was SOOOO not in the mood to smile and sell my stuff. But I did anyway (plus my friends showed up to help, which cheered me up!) and I got a lot of return customers from one day to the next! All these teenage girls kept coming back to talk to me, it was adorable! If I would've let my mood take over I would've sat glowering at everyone, but instead I said hi to each customer and sold my products cheerfully. Always stay proffesional.
10. Promote your fair. I know, that's the job of the advertisers ... but in my case, I wasn't sure there was advertising to my demographic. The fair organizers had advertised in the newspaper and around their neighborhood, but I hadn't seen anything on craigslist, facebook, or myspace!! So I got promoting, created a facebook event and a craigslist post. We all know how to advertise here, and the more customers a fair has, the better EVERYONE benefits.
If I think of any more tips I will update! Please add your own too!
Subscribe to:
Posts (Atom)