Showing posts with label diy. Show all posts

Monday, August 9, 2010

Work Outfit, and How Much I Love the Salvation Army


Isn't it amazing how dress can affect attitude? Today I dressed smartly and responsibly and as a result I feel like a super-competent intern, ready to impress the entire company while crossing tasks off my list like some kind of task-completing superintern. Amazing. The above is representative of my outfit, except that my necklace is 2 strands turquoise beads and 1 strand of tiny rhinestones, and it was only $10 from Urban Outfitter's; my bag is just a turquoise crossbody with a little fringe detail; my belt is a ruched black satin Calvin Klein with a shiny seatbelt-buckle closure; and my shoes are strappy black wedges, not peeptoe slingbacks. But hey, close enough.

The shirt is a black men's express shirt, size S, which fits great because it's stretchy. I got it at the Salvation Army for $1. Let me just give a shoutout to this salvation army. If you ever find yourself in Northern Massachusets, there are 3 places you must visit: Newburyport, Salisbury Beach, and this Salvation Army. It's in Haverill, which is a dump, but it's like the size of a small department store and filled with great finds. I got $70 worth of Calvin Klein, Geoffrey Beene, Oscar de la Renta, Van Heusen, and Jessica McClintock. I'll take pictures of them all later - most of them are wonderful button-ups, half for my boyfriend who is lacking in appropriate business attire (he wears button ups from Wal Mart and dress pants that are a size too big, although his suit jackets are pristine!) and the other half is for me, because I adore the menswear look. They are all in great shape and have beautiful fabrication. I'm so excited! All the shirts were $5 or under, some of them $1 because of the tag sales they have every day (each day, a different color tag on a garment magically turns all of those garments into $1 steals). Then I got 2 black purses that I could start a DIY project, a fringed handbag.

It's not turning out too well at the moment because after I cut up my cheap PVC Nine West purse, it turned out to have interfacing attached to EVERY piece. So I have to sew pieces together, which upsets my sewing machine ... and it's not very hangy, either. I may need to find some real leather, though I am reluctant to cut up my leather binder and leather messenger bag from the Salvation Army (guys, I went crazy. I only had an hour and a half in there, and I could've spent at least 5 hours more!)

My internship is almost over and I've learned so much. Post on that coming soon. In the meantime, I ask you: what outfit makes you feel capable of accomplishing any task? Because I want to copy it. XOXO

Wednesday, October 21, 2009

Caffiene is my god

So I'm taking a quick, jittery break from studying. By the way, if anyone wants to know about marginal propensity to consume or save, real GDP, aggregate demand or supply and/or disposable income, ask me, since I now understand it enough to feel relatively confident about my midterm tomorrow. Does anyone else love caffiene this much? Seriously. Best invention ever. Anyway so I'm officially scheduling in time to work for OmgLia since I'm not getting much done updating at 3am every night... from now on, Friday is OmgLia day. I will wake up early and report to work at the library, and work diligently until I am all caught up! Mostly for my benefit, but also for all those who are curious what tasks go into running a DIY shop from a dorm room, here is my To Do List for the next few Fridays:

1. Update Etsy/website with finished pictures (finished means cropped, resized, background whited out, and any contrast or color adjustments.)


a) Alice in Wonderland Line (preview to the left)
b) New stud earrings
c) Necklaces, earrings and clearance updates (need to move old items to clearance!)
d) Add new photoshoot pics to existing items


2. Advertising


  • a) Set advertising budget, contact collected potential advertisers to purchase slots

  • b) Write advertising code and page for OmgLia to bring in more advertising revenue

  • c) Make new advertisement banner, whore it everywhere

3. Accounting


  • a) finish updating 2009/2008 balance sheet using paypal, propay and income statement

  • b) Add any values from receipts including post office fees, credit card purchases, etc

  • c) Collect data from net income or loss per month

  • d) all kinds of data analysis! (this part is only fun if you are a huge excel nerd, which I am!!)

4. Newsletter

  • a) Depending on budget, purchase newsletter production company like Vertical Response

  • b) Develop template for regular newsletters

  • c) Set up a schedule for sending newsletters (Currently it's something like whenever I feel like it, which is not often enough to bring back many customers!)

  • d) Create newsletters with original content, coupon codes, pictures, etc that people will actually read, not send to spam box, and perhaps even click on once in a while!

5. Blog

  • a) Brainstorm blog posts based on polling various readers about what they want to read about. Create blog posts. Post regularly!

  • b) Research ways to get more traffic to my blog (keywords?)

  • c) Figure out how the hell to move this blog over to http://blog.omglia.com/ >.<

6. Etc

  • a) using new site banner, design new bag toppers, etsy banner, link banners, and business cards.

  • b) order more business cards

  • c) Depending on budget, purchase Flickr account and upload as much as possible to it.

  • d) take pictures of any leftover inventory to upload to site

  • d) make more stuff (funny, you'd think this would be a more important one, but honestly with all the rest of the stuff I have to do, creating inventory is really NOT as prioritized as one would assume. They should tell you these things BEFORE you start your own DIY business!)

Anyway. So that's that. Now I shall return to studying. PS, note for all college students reading this: IF YOU HAVE NOT BEEN TO YOUR UNIVERSITY LIBRARY, VISIT IT ASAP. I've only recently made studying at the library a habit of mine, and I've noticed SUCH a change in productivity from when I tried to study (unsuccesfully) in my dorm room. Also, the resources of the IU library are absolutely staggering: everything from paid subscriptions to any online article I could ever want to read, to one-handed keyboards in case I break my arm, to printers capable of creating life-size posters, to ... well, books. They even have a cafe downstairs with SUSHI, and 5 floors of studying lounges. AWESOME. I'm making a library kit with all the neccessaries to take with me every day when I stop by here for HOURS. Ok. seriously, back to studying. And also my favorite picture of me from this weekend's photoshoot!


Friday, July 25, 2008

Craft Fair Sign Tutorial


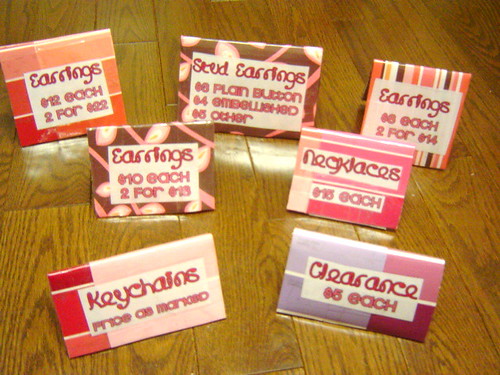
This is the tutorial for my sign displays!
You Will Need
1. Good cardboard. Any ordinary cardboard box will be fine. It doesn't matter if it has writing on it. You'll also need a bit of lighter cardboard, like a cereal box. Yay, recycling!
2. Pretty paper. I used a combination of scrapbooking paper from a craft store and free paint samples from Home Depot! Construction paper, wrapping paper, etc will also work well. Whatever looks good. If you want your signs to match, though, make sure you have enough! I didn't, as you can see, so they're all kind of in the same general color scheme.
3. Access to a printer and computer for designing the actual text. If you're fabulous at handwriting or something, I guess that'll work too, but I found that printed text makes it look more proffesional.
4. Scissors! And possibly a box cutter if you're into that.
5. CLEAR PACKING TAPE. This is important. It's to waterproof everything so it lasts longer!

Let's Begin!
1. Design your labels, print and cut them out. My labels included the name of the item, its price, and sometimes discount for multiple purchases.
2. Cut out strips of cardboard. You will be folding these in half, so make them twice the length of your sign size. To find the width, I held up the cut-out label on top of the cardboard and cut around it. You can of course also make them all one size.
3. Fold your cardboard strips in half. Now they should look like little tents! Cute! If you're using cardboard with writing on it, consider folding them with the writing on the OUTSIDE and the blank side on the INSIDE, because that way you won't see any of the writing stuff once it's covered up *shrug* I'm OCD, are you? Hehe.
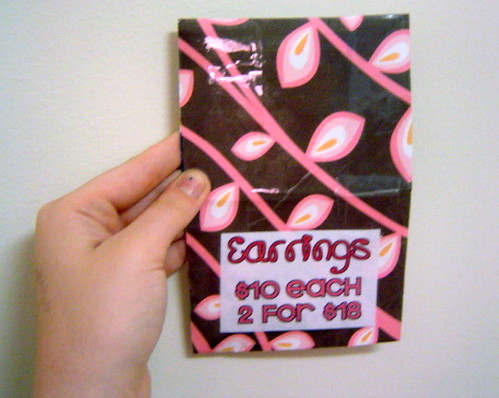
4. Time to get out your tape! Cover your cardboard strip with the decorative paper, tape it in place and then tape all over it (in straight lines, so it looks neat). Also tape your label in place on one (or both, if you like) sides. See the picture to the left for what it should look like now!
5. To prevent sign your flattening on your table, we're going to make a little bridge at the bottom of each tent to hold it in place. I used paint sample paper; any light cardboard (get out those cereal boxes now!) will work fine. Fold your tent again and set it at the angle you would like it to stay at forever. Cut out a strip of light cardboard the width of the bottom of your tent. Then tape it to the bottom on top AND bottom of the strip. This is kinda hard to explain, but I'll try. Place a strip of tape underneath the cereal box strip so it goes around on top of the decorative paper sides of the sign, and also one on TOP of the cereal box strip so it stays in place with the tape going up the sides on the INSIDE of the tent. Does that make sense?

Now your sign is done! Just repeat these steps to make the rest of your signs. They should be sturdy and waterproof, as well as proffesional looking and perfect for your craft fairs! Here is an action shot of my signs:

Tuesday, March 25, 2008

Things to Bring to a Craft Fair: The Ultimate List

I've been reading as many articles and posts as possible in preparation for my first 3 craft fairs, and I've compiled a giant list of things to bring (aside from your items + setup stuff, which I hope is obvious.) Here it is! Please add if you don't see something listed.

-business cards
-credit card accepting things if applicable
-lots of extra change (1$s and coinage)
-Notebook to Sign Up for Mailing List
-photo album of work sold
-prices for everything
-wear my items
-tempting basket of free candy
-other crafter's freebies/promo packs
-bags for people who make purchases (paper, staples?)
-Bring something to work on while you sit behind the booth. Doing your craft on the spot draws in customers.
-Have different levels on your display.
-Bring a CALCULATOR for sale totals
-small plastic bag for trash
-signage
-folding chairs
-bring extra lighting
-CLIP ON BACKS and needlenose pliers for jewelry, just in case of requests or repairs
-receipt slips or papers
-tape, paper, pens, scissors
-tablecloth
-mirror for jewelry or clothing
-Sign up sheet for mailing list or custom orders
-Writing pens for customers to write checks
-Notebook to note who bought what, payment type & price
-paper towels/baby wipe/purell

Please let me know if I've missed anything!
I found another great link here http://sunshineglassworks.com/articles/craftshowlist.shtml
(Ps - the picture is of jewelry I made over spring break to take to my shows, so it's not TOTALLY unrelated. I think it's an awesome pic though!)

Wednesday, March 19, 2008

Craft fair jewelry displays!

I spent all weekend working on these DIY jewelry displays! Feel free to grab some inspiration from my idea :)

BEFORE:

Ewwwww
AFTER:


I have several sizes, but I don't have pics of them yet!
Materials:
-A bunch of frames from the dollar store, big lots, etc
-Mosquito netting
-Lots of hot glue (or any other really good glue, I suppose.)
-Paint and paintbrush.
I painted mine matte black, I haven't glossed over them with varnish yet. I'm probably going to add some polka dots or something with a paint pen afterwards to customize them. What do you think? Eye catching? Effective?