Showing posts with label crafty organization. Show all posts

Wednesday, May 20, 2009

First craft fair of the summer!

So my first craft fair was a total success! I tripled my entry fee and then some. Of course, let's keep in mind that this was the cheapest of all the fairs I'm doing this summer ... the one coming up in July is $500!

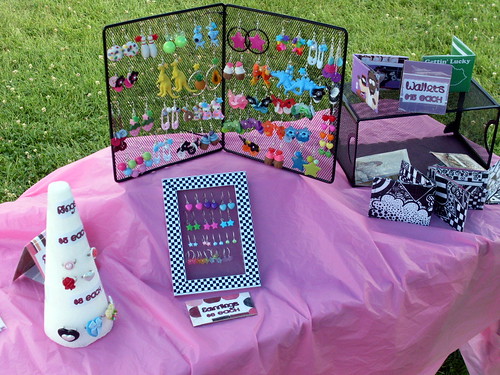
See the 10 or so carebears chillin around my table? They are KID MAGNETS. As if my booth wasn't already pink and girly enough, little girls could NOT resist dragging their mommies into my booth to point out each of the carebears by name and squeal happily (meanwhile, their mothers looked at the jewelry! Win!) I also had some other kid-magnet props like a unicorn head and a gumball machine. *tents fingers evilly* little kids cannot resist the gumball machine.

Unfortunately for me, little kids also have no money, so I have to rely more on parents and older chicks for sales. My first two sales were to women in their 30s, one of which kept stopping in to tell me how many compliments she'd gotten on her new skull earrings! And one preteen girl and her mother apparently shared the same taste in jewelry and bought over $50 worth of merchandise between them!! Now that is my FAVORITE kind of sale.


I've definitely learned some good lessons from this first fair which I'm going to apply to my future fairs this summer. Hopefully these can help some of you as well.

1. Accept credit cards! Over half of my sales were charged to a credit card, and the majority of the sales on credit were higher cost items. I use ProPay, an affordable credit card processing platform. As long as you have the CC number, expiration date and zip code, you can go online to the propay site and process any amount on the card. I couldn't figure out how to work my Knuckle Buster so I ended up writing them all down by hand and shredding them once I had processed the cards, but all of the orders went through and I'm really glad I took CCs!

2. Showcase your least expensive items! My stud earrings are $3-$5 and I put them front and center. Lots of shoppers made impulse buys or didn't want to spend very much, so having them featured like that really helped them to sell, in my opinion.

3. Use eyecatching displays! Heads literally turned when people passed my booth. Not only is everything bright pink and colorful, but I had so many interesting props to look at that several people came in just to examine them! I found most of my props at yard sales and flea markets for cheap!

4. Don't pack up until the fair is really over. My biggest sale happened less than an hour before the fair was schedule to end. I know it takes a while to dis-assemble a booth, but it's not worth saving an extra few minutes if you lose a customer!

5. Test your display before attend a fair! I ALMOST did this. I set up my tables and tablecloth in a room in my apartment, and halfheartedly tossed some of my props on top. But I didn't set it up completely and I'm really sorry I didn't. I need another table, more displays with varying heights, and better necklace displays. Luckily I've got time to get these things before my next fair in a month!

Friday, July 25, 2008

Craft Fair Sign Tutorial


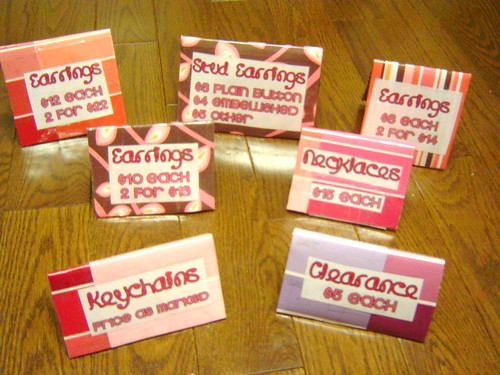
This is the tutorial for my sign displays!
You Will Need
1. Good cardboard. Any ordinary cardboard box will be fine. It doesn't matter if it has writing on it. You'll also need a bit of lighter cardboard, like a cereal box. Yay, recycling!
2. Pretty paper. I used a combination of scrapbooking paper from a craft store and free paint samples from Home Depot! Construction paper, wrapping paper, etc will also work well. Whatever looks good. If you want your signs to match, though, make sure you have enough! I didn't, as you can see, so they're all kind of in the same general color scheme.
3. Access to a printer and computer for designing the actual text. If you're fabulous at handwriting or something, I guess that'll work too, but I found that printed text makes it look more proffesional.
4. Scissors! And possibly a box cutter if you're into that.
5. CLEAR PACKING TAPE. This is important. It's to waterproof everything so it lasts longer!

Let's Begin!
1. Design your labels, print and cut them out. My labels included the name of the item, its price, and sometimes discount for multiple purchases.
2. Cut out strips of cardboard. You will be folding these in half, so make them twice the length of your sign size. To find the width, I held up the cut-out label on top of the cardboard and cut around it. You can of course also make them all one size.
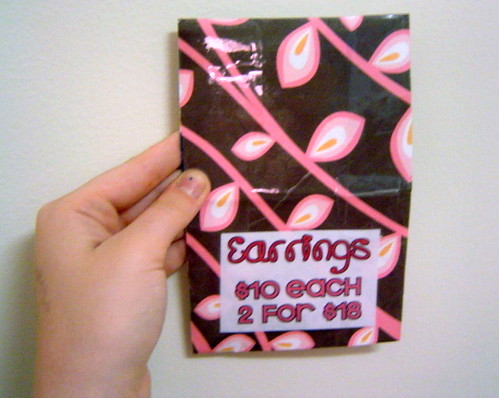
3. Fold your cardboard strips in half. Now they should look like little tents! Cute! If you're using cardboard with writing on it, consider folding them with the writing on the OUTSIDE and the blank side on the INSIDE, because that way you won't see any of the writing stuff once it's covered up *shrug* I'm OCD, are you? Hehe.
4. Time to get out your tape! Cover your cardboard strip with the decorative paper, tape it in place and then tape all over it (in straight lines, so it looks neat). Also tape your label in place on one (or both, if you like) sides. See the picture to the left for what it should look like now!
5. To prevent sign your flattening on your table, we're going to make a little bridge at the bottom of each tent to hold it in place. I used paint sample paper; any light cardboard (get out those cereal boxes now!) will work fine. Fold your tent again and set it at the angle you would like it to stay at forever. Cut out a strip of light cardboard the width of the bottom of your tent. Then tape it to the bottom on top AND bottom of the strip. This is kinda hard to explain, but I'll try. Place a strip of tape underneath the cereal box strip so it goes around on top of the decorative paper sides of the sign, and also one on TOP of the cereal box strip so it stays in place with the tape going up the sides on the INSIDE of the tent. Does that make sense?

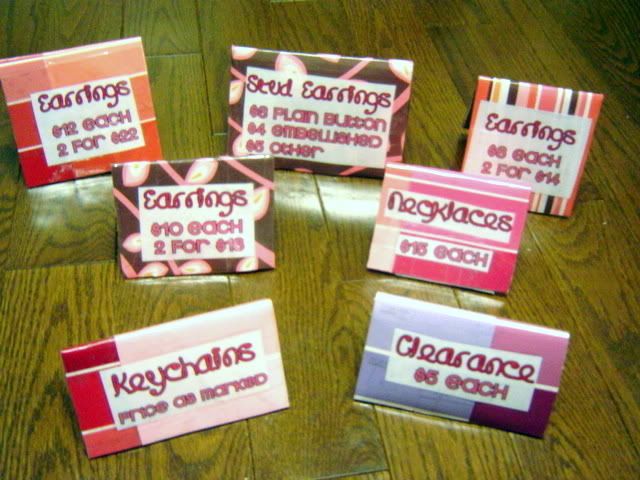
Now your sign is done! Just repeat these steps to make the rest of your signs. They should be sturdy and waterproof, as well as proffesional looking and perfect for your craft fairs! Here is an action shot of my signs:

Tuesday, June 24, 2008

Craft Fair Tips

I've been thinking, and I've decided that with 3 craft fairs under my belt (2 not-so-good ones and one very succesful one) I might as well write down some tips for the n00bs. In no particular order, here are mine:

1. Bring everything on this list. I packed up a big box for my first fair and just bring it to each subsequent fair, and nothing ever gets left behind!

2. Make a big excel file of all of your inventory and its price. When you sell something you can cross it off, and then at home you can tally up everything you've sold on the computer to keep track of it really easily. Plus it helps if you forget the price of something or other.

3. Mark prices very clearly. Some people don't like to ask, and some people decide what to buy based directly from the prices they see. This picture shows my pricing signs: they are little triangles made out of recycled cardboard and pretty paper, laminated (and waterproof) with clear tape. Easy fast and cute, and I can reuse them over and over! I'll make a tutorial if anyone wants one.

4.Have freebies, either from your shop or other people. It creates loyalty because everyone loves freebies! Freebies for your own shop (promotional freebies) should be USEFUL so they don't just get thrown away. My favorite item for this is magnets, which I make myself. Pens, mirrors, etc might also work wonderfully! Make sure your URL is on there and all that. I gave away all but 3 of the 50 or so magnets I had sitting out there, and now they're all sitting on people's fridges for them to see every day!

5. packaging! Bring bags (NOT recycled wal mart bags) with your url or logo somewhere on it. Include a biz card inside. I also toss in etsy promotional packs, makes them feel like they're getting more freebies! Consider wrapping and whatnot if your item works that way.

6. Have a draw like the giant teddy bear I used at my last fair! (see my previous entry for pics) it will attract your target demographic. If you're a soap seller, think about how The Body Shop always has that little dish set out with yummy smelly samples in it OUTSIDE their store, to draw people in, for example. If you sell plushies, make a huge one. If you sell clothes, put your best outfit on a mannequin. Etc! People will see it from far off and want to come check out your stuff!

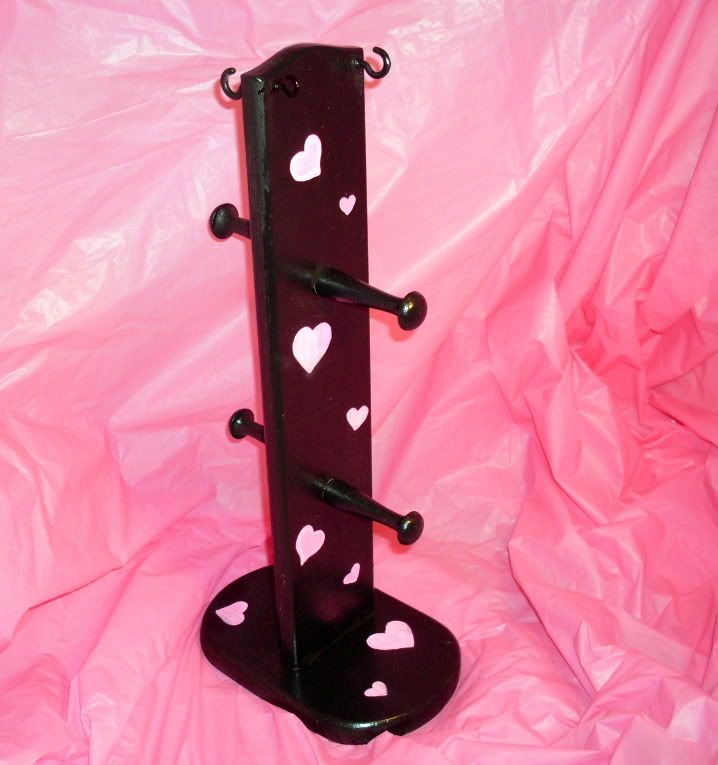
7. Displays. Think about how you want your items to be seen. If you are marketing adult-oriented, sophisticated stuff, you may want all matching displays. I personally chose a variety of themed displays for my tables, so it doesn't match very well but does look interesting. For some ideas on DIY jewelry displays, click here. The picture is of an old, dirty necklace stand that I painted! Get creative.

8. You'll hear this one a lot - levels! You need your table to have lots of levels so it doesn't look all boring just laid out in one spot. I personally like to put a box underneath my tablecloths to mix it up and then put things on top of that. The picture is an example. See how one jewelry display is much higher than the other? It makes it look more interesting. Plus, you can fit more stuff on your table that way! Also consider hanging things from the side of your tent. The more levels, the better!

9. Be friendly. My last craft fair, I was going through a breakup. I was SOOOO not in the mood to smile and sell my stuff. But I did anyway (plus my friends showed up to help, which cheered me up!) and I got a lot of return customers from one day to the next! All these teenage girls kept coming back to talk to me, it was adorable! If I would've let my mood take over I would've sat glowering at everyone, but instead I said hi to each customer and sold my products cheerfully. Always stay proffesional.

10. Promote your fair. I know, that's the job of the advertisers ... but in my case, I wasn't sure there was advertising to my demographic. The fair organizers had advertised in the newspaper and around their neighborhood, but I hadn't seen anything on craigslist, facebook, or myspace!! So I got promoting, created a facebook event and a craigslist post. We all know how to advertise here, and the more customers a fair has, the better EVERYONE benefits.

If I think of any more tips I will update! Please add your own too!

Craft Fair Pictures!


Pictures of my latest fair, as promised, are here! This first picture is of little Lia the Bear, complete with DIY reconstructed top and ice cream cone! She was popular with the kids who all wanted to buy her :P This fair was 2 days long. These pictures were taken on the first day, which was unfortunately very gloomy and rainy and not too many people showed up. The 2nd day which I have no pictures of was bright and sunny and tons of people came! Also on the second day, I put up a pink sheet in the back of my tent so you couldn't see the ugly caution tape and cars like in this picture, so just imagine that there, hehe. I wore my hair down the first day b/c it was cold, but the 2nd day I was sweating in my shorts all day long! This next picture is of some earring and ring displays and also my newwwwww graphic art wallets which aren't on the site yet but are coming REALLY soon! I sold 2 wallets, and lots of people stopped to look at them, so I hope that's a good sign!

The only snag I hit with my display was that at one point my tent collapsed, nearly taking out a customer! It just started leaning over ... and over .... and over until I looked up and realized it was almost completely parallel to the ground! The weight of the supply displays on the sides must have sagged it down. Anyway the guy next door helped me hammer each leg deep into the ground so it stayed firm the rest of the fair. I guess you get what you pay for, because my tent was $50 on ebay.
The rest of my pictures are over at My Flickr. Suggestions for improving my booth are welcome!

Sunday, May 4, 2008

Craft Fair: The Aftermath


So, that's me ... making a funny face and looking weird at my booth! Just a thought, but the face might have been from the intense freezing cold that was permeating my poor bones (and it was only 8am!) The Chili Cookoff was a total success for chili cooks, but not so much for us crafters .... which was only like 5 people! Lesson learned: only sign up for shows that people interested in buying my stuff will be attending. At any rate, it was an experience. I sat with my sister and her fiance for about 12 hours in 40 degree windy weather (At least it didn't rain) while odd folks in cowboy hats and overalls walking around tasting chili (which was odd, considering I'm from KY and I was in CT, and I definetly didn't expect to see cowboy hats and overalls.) There were lots of little girls with cheap parents who wouldn't buy their kid my stuff (lame) but also some really nice folks including Jillian from Ms. Kitty Fantastico, leader of the CT street team who I met and who is wonderful! All in all, I came out just about even - the entry fee was $50, and I made $41 plus my sister and her fiance bought 3 things which I kind of don't count, hehe. Anyway, in the weeks leading up to my next craft fair (on the 20th!) I'll be posting pics of my DIY labels and signs and whatnot. In the meantime check out My Flickr Photostream for more pics of the fair and what I've been working on!

Thursday, April 24, 2008

Craft Fair in 1.5 Weeks!

Turtle Sex!
So, I'm back from my nice little mini-vacay in time to realize that my first ever craft fair is next-next Saturday! Yikes! I know that you all want to hear the mushy details about my visit home but I hope that this picture of 2 turtles we saw at the Zoo on Sunday will suffice for now (infer what you will. By thw way, if I ever have a turtle, I'm naming it Skipperdee like in Eloise.)
Anyway, because the craft fair is so soon, I'm working my butt off starting today. I've been making stuff nonstop since 10pm (it's 3:30 now! Class in the morning! Woohoo.) I made 10 keychains (they're fun! Why haven't I made more before this?) and 5 necklaces. So that's a decent $100 minimum if they sell. I also sold a bunch of stuff today for some odd reason (3 pairs of earrings and 2 supply lots) so that's more stuff to send out and less to sell at the fair. Oh well, at least I came home to TONS OF BUTTONS for my wholesale order (still need more though, poo.) Awesome button lot from SewRad!
Anyway, here's a list of things (mostly for my benefit, skim if you must)to do before my fair:
1. Finish felt sign, sew letters onto sheet.
2. Finish label cards, attach logo onto cardboard backings.
3. Steal more bags from the campus center (ssh, I already paid 50k for them.)
4.Create a giant excel file of all the items I am bringing to the fair
5. Work on getting omglia.com functional (possibly before next fair)
6. Sew the half-made wallets, and make more!
7. Sew some tops!! Lots of them!!
8. More necklaces! and earrings!
9. Big batch of button stud earrings: assemble and decorate
10. Get propay account set up
11. Set up tent outside to test it out, check for weights
12. Put all the stuff from my Things to Bring to a Craft Fair post in a box, ready to go.
13. Possibly start work on portfolio
14. Take a giant 2hr round trip (ugh) visit to the mall for more buttons, more keychain pulls and flickr prints at target (which are apparently free) for portfolio
Phew. Hey, is anyone else NOT looking forward to finals which are conveniently RIGHT after my fair? Relaxing ... what's that?

Monday, March 31, 2008

The Travesties of Dorm Life

So what this blog is really about is how to run a business from a dorm room. This is something I'd better become an expert at, because I might be in college for a while if I go ahead on getting my business degree (at Indiana University, where I'll be transferring next year!)

I thought I'd show you all my "work space," if you can call it that. It consists of a desk, which my sewing machine shares with my makeup and books, and my bed. Storage space is one of those Target plastic drawer thingies. And my shipping supplies are stuffed into a desk drawer which is too full to close.
If you want to see all the photos of my dorm room "work space," visit my Flickr Account.

Wednesday, March 19, 2008

Craft fair jewelry displays!

I spent all weekend working on these DIY jewelry displays! Feel free to grab some inspiration from my idea :)

BEFORE:

Ewwwww
AFTER:


I have several sizes, but I don't have pics of them yet!
Materials:
-A bunch of frames from the dollar store, big lots, etc
-Mosquito netting
-Lots of hot glue (or any other really good glue, I suppose.)
-Paint and paintbrush.
I painted mine matte black, I haven't glossed over them with varnish yet. I'm probably going to add some polka dots or something with a paint pen afterwards to customize them. What do you think? Eye catching? Effective?